APU2, Alpine Linux and v6plus
by SirnMany ISPs in Japan have started offering IPv4-over-IPv6 tunnel for their customers in recent years. Most of IPv4-over-IPv6 tunnel providers in Japan either utilizes Dual-Stack Lite (DS-Lite), such as transix service from mfeed, or Mapping of Address and Port with Encapsulation (MAP-E, RFC 7597), such as JPNE (offered as v6plus service).
This article is my notes for setting up the excellent PC Engines APU2 as a router and wireless access point using Alpine Linux using MAP-E with So-net and JPNE. It wouldn't have been possible without the help of the following articles (in Japanese):
Environment
I'm currently using NTT Flet's Next with v6 Option enabled. NTT only provided me an ONU so I need a router with v6plus support. Instead of buying off-the-shelf router, I decided to just build one myself. These are equipments I'm using:
- NTT GE-PON<FA>F ONU Type D (provided by NTT)
- PC Engines APU2E4 with WLE900VX (802.11ac capable)
- DTECH USB Serial USB-RS232C (crossover RS-232 cable for APU2)
- USB flash drive (for installation)
I chose Alpine Linux mostly because of a diskless mode and LBU. Alpine Linux can be run completely in-memory with diskless mode and LBU can be used to commit local changes to a writable medium as an archival file (.apkvol.tar) which are loaded on each boot. In case anything goes wrong, I can reboot the router and everything is back to its last known good state.
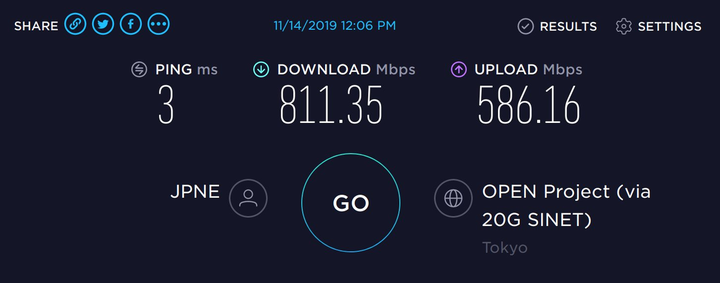
Speedtest result of v6plus, connected via Gigabit Ethernet. 802.11ac with WLE900VX can manage up to latency of 4 ms, download of 400 Mbps and upload of 300 Mbps. Your mileage may vary.
Setting up Alpine Linux on APU2
Download Alpine Linux from download page and write it to a USB flash drive. My USB flash drive is on sdb:
$ curl -sSL -O http://dl-cdn.alpinelinux.org/alpine/v3.10/releases/x86_64/alpine-standard-3.10.3-x86_64.iso
$ sudo dd if=alpine-standard-3.10.3-x86_64.iso of=/dev/sdb bs=1M
APU2 can only be accessed via serial console using a crossover RS-232 cable (a.k.a. Null Modem cable). I bought DTECH USB Serial from Amazon Japan which has been working great. I've found PuTTY for Linux to be the least painful way of dealing with serial console.
Insert USB flash drive to APU2, plug in the LAN cable to the ONU and the APU2, plug in the serial cable, open the serial console, press F10 to enter the boot menu, then choose flash drive. At the bootloader prompt, append console=ttyS0,115200 to a kernel name to enable serial console:
Booting from Hard Disk...
ISOLINUX 6.04 6.04-pre1 EHDD Copyright (C) 1994-2015 H. Peter Anvin et al
boot> vanilla console=ttyS0,115200
Once boot, login with username root with password alpine. If v6 Option is available, eth0 (or the port plugged into ONU) should get IPv6 automatically but not IPv4. Fortunately, Alpine Linux mirrors do also provides IPv6 access. Here we're going to setup network, hostname and mirrors.
# ip link set eth0 up
# echo "borealis" > /etc/hostname
# cat <<EOF >> /etc/apk/repositories
http://dl-cdn.alpinelinux.org/alpine/v3.10/main
http://dl-cdn.alpinelinux.org/alpine/v3.10/community
EOF

# apk update
# apk add syslinux dosfstools
# fdisk /dev/sda
Command (m for help): g
Command (m for help): n
Command (m for help): a
Command (m for help): w

# mkfs.vfat -F32 /dev/sda1
# setup-bootable /media/sdb1 /dev/sda
We do not need part number (sda instead of sda1) since we're also installing bootloader, and Alpine setup-bootable is smart enough to figure everything out.
Once done, do not reboot yet. Mount /dev/sda1 to /mnt and edit /mnt/boot/syslinux/syslinux.cfg and add SERIAL 0 115200 as well as console=ttyS0,115200 to kernel parameters:
+SERIAL 0 115200
 TIMEOUT 20
 PROMPT 1
 DEFAULT vanilla

 LABEL vanilla
 MENU LABEL Linux vanilla
 KERNEL /boot/vmlinuz-vanilla
 INITRD /boot/initramfs-vanilla
 DEVICETREEDIR /boot/dtbs
-APPEND modules=loop,squashfs,sd-mod,usb-storage quiet nomodeset
+APPEND modules=loop,squashfs,sd-mod,usb-storage quiet nomodeset console=ttyS0,115200
Also edit /mnt/boot/grub/grub.cfg:
 menuentry "Linux vanilla" {
-linux   /boot/vmlinuz-vanilla modules=loop,squashfs,sd-mod,usb-storage quiet nomodeset
+linux   /boot/vmlinuz-vanilla modules=loop,squashfs,sd-mod,usb-storage quiet nomodeset console=ttyS0,115200
 initrd  /boot/initramfs-vanilla
 }
Run shutdown -p now to poweroff, remove the USB flash drive, and power on the APU2 again. This time we'll be booting from the disk from a clean state.
While it's possible to configure Alpine Linux without first rebooting into a disk installation (because what has been written to the disk is essentially the same as the flash drive image, and LBU will apply our changes on top of it), I like starting clean so I could keep track of what is installed as part of installation process, and what is essential for running the system.
Login with root password alpine and configure the system (again). Here we're going to use s6 to supervise few services so they're restarted when they're crashed. This is the case with hostapd (for Wi-Fi) where a bug in a driver may cause the daemon to crash which will make us lost our connection:
# echo "borealis" > /etc/hostname
# cat <<EOF >> /etc/apk/repositories
http://dl-cdn.alpinelinux.org/alpine/v3.10/main
http://dl-cdn.alpinelinux.org/alpine/v3.10/community
EOF

# passwd
# adduser -G wheel sirn
# passwd sirn

# ip link set eth0 up
# apk install ca-certificates curl haveged openntpd openssh s6
# rc-update add haveged default
# rc-update add openntpd default
# rc-update add openssh default
# rc-update add s6-svscan default

# lbu status
# lbu commit
# reboot
Need to reboot to make sure the apkvol could be restored. Once rebooted, I can now login with my username and password. We're ready to setup the APU2 as a router.
Setting up IPv6 and IPv4
In contrast to IPv4 where a home internet customer usually get a single dynamic IP address, IPv6 is usually assigned to a customer as a /64 prefix (i.e. 2^64 or 18,446,744,073,709,551,616 addresses). IPv6 network do not require NAT, as all devices get its own internet addressable address(es). There are some privacy implications, but it is beyond the scope of this article.
Since we won't get IPv4 via DHCP for eth0, we have to bring the interface up on boot without having it trying to get an IP address. Add the following lines to /etc/network/interfaces:
auto eth0
iface eth0 inet manual
    pre-up ip link set eth0 up
    post-down ip link set eth0 down
Then bring the interface up:
$ sudo ifup eth0
Since APU2 is going to act as a wireless router as well as a switch, we need to bridge all other ports with eth0 so devices connected to it can access the internet. First install the bridge package:
$ sudo apk add bridge
We're going to use 10.100.0.0/24 as our internal network. Here we also assign IPv4 address to the bridge to let other devices access the router via 10.100.0.1. Add the following lines to /etc/network/interfaces:
auto br0
iface br0 inet static
    address 10.100.0.1
    netmask 255.255.255.0
    network 10.100.0.0
    broadcast 10.100.0.255
    bridge_ports eth0 eth1 eth2
    bridge_stp off
    up sh /usr/libexec/setup-v6plus.sh
We're not bringing br0 up at the moment, since /usr/libexec/setup-v6plus.sh still doesn't exist. We're going to use dnsmasq to provide DHCP for IPv4 clients:
$ sudo apk add dnsmasq
$ sudo mkdir -p /var/svc.d/dnsmasq
$ cat <<EOF | sudo tee /var/svc.d/dnsmasq/run
#!/bin/execlineb -P
fdmove -c 2 1
/usr/sbin/dnsmasq -k
        --pid-file=
        --user=dnsmasq
        --group=dnsmasq
        --conf-file=/etc/dnsmasq.conf
EOF

$ cat <<EOF | sudo tee /etc/init.d/s6-dnsmasq
#!/sbin/openrc-run
description="dnsmasq supervised under s6"
supervisor=s6
s6_service_path="/var/svc.d/dnsmasq"

depend() {
        need s6-svscan
}
EOF

$ sudo chmod +x /var/svc.d/dnsmasq/run
$ sudo chmod +x /etc/init.d/s6-dnsmasq
$ sudo rc-update add s6-dnsmasq default

$ cat <<EOF | sudo tee /etc/dnsmasq.d/10-br0.conf
interface=br0
dhcp-range=10.100.0.100,10.100.0.254,255.255.255.0,12h
dhcp-option=6,10.100.0.1
EOF

$ cat <<EOF | sudo tee /etc/dnsmasq.conf/00-dns.conf
port=0
server=1.1.1.1
server=1.0.0.1
no-resolv
EOF
If the /usr/libexec/setup-v6plus.sh line in /etc/network/interfaces is commented out, and br0 has been brought up with ifup br0, then all devices connected to APU2 should now have both IPv4 and IPv6 addresses, but could only access IPv6 internet since we still haven't setup MAP-E yet.
Setting up MAP-E
MAP-E works by setting up a Consumer Edge device (CE) with a specific IPv6 address according to MAP rules, then open a 4over6 tunnel to the Border Relay (BR) IPv6 address. This link is called MAP domain. MAP rules use few specific bits from IPv6 prefix to form an address for CE IPv6 and CE IPv4. An example of a MAP rules calculation can be found in RFC 7597 Appendix A.
We can use a tool at ipv4.web.fc2.com/map-e.html to calculate CE IPv6, CE IPv4, and port numbers. Take the assigned IPv6 (240b:10:.. in case of v6plus) and put it in the input box. Take note of CE IPv6 address (CE), CE IPv4 (IPv4 アドレス) and port numbers (ポート番号).
One of the biggest hurdle of setting up our own MAP-E was to find out about the Border Relay (BR) IPv6 address. Fortunately So-net's JPNE BR IPv6 address is pretty well-known (searching for "So-net BR アドレス" should yield some results). Create /usr/libexec/setup-v6plus.sh with the following content:
#!/bin/sh
set -e

BR=".."           # BR IPv6 address
CE=".."           # CE IPv6 address obtained from the calculator above
WAN="br0"         # Interface of the WAN or a bridge
TUN="ip6tnl1"     # Name of the tunnel

if ! ip -6 addr show $WAN | grep -q $CE; then
    ip -6 addr add $CE/64 dev $WAN
fi

if ! ip -6 tunnel show $TUN >/dev/null 2>&1; then
    ip -6 tunnel add $TUN mode ip4ip6 remote $BR local $CE dev $WAN encaplimit none
    ip link set dev $TUN mtu 1460
    ip link set dev $TUN up
fi

sysctl -q net.ipv4.conf.$WAN.rp_filter=0 || true
sysctl -q net.ipv4.conf.$TUN.rp_filter=0 || true

route delete default 2>/dev/null || true
route add default dev $TUN || true
The script setup a MAP domain by assigning CE IPv6 to the WAN interface (or a bridge) and create a tunnel to BR. All IPv4 traffic need to be sent to the tunnel interface, so we setup a default route to send all IPv4 to the tunnel. Next, we need to setup nftables to do SRCNAT to specific port numbers according to MAP rule.
$ sudo apk add nftables
$ sudo rc-update add nftables default
Edit or create /etc/firewall.nft with CE IPv4 and port numbers obtained from the calculator. Few parts are omitted for brevity. Number of marks we needed is the number of port range we obtained from the calculator:
#!/usr/sbin/nft -f

flush ruleset

table ip nat {
    chain prerouting {
        type nat hook prerouting priority -100; policy accept;
        numgen inc mod 15 0 mark set 0x00000011
        numgen inc mod 15 1 mark set 0x00000012
        # ..snip..
        numgen inc mod 15 14 mark set 0x0000001f
    }

    chain input {
        type nat hook input priority 100; policy accept;
    }

    chain output {
        type nat hook output priority -100; policy accept;
        numgen inc mod 15 0 mark set 0x00000011
        numgen inc mod 15 1 mark set 0x00000012
        # ..snip..
        numgen inc mod 15 14 mark set 0x0000001f
    }

    chain postrouting {
        type nat hook postrouting priority 100; policy accept;
        oifname "ip6tnl1" ip protocol icmp mark 0x00000011 snat to CE_IPv4:Port_Numbers1
        oifname "ip6tnl1" ip protocol tcp  mark 0x00000011 snat to CE_IPv4:Port_Numbers1
        oifname "ip6tnl1" ip protocol udp  mark 0x00000011 snat to CE_IPv4:Port_Numbers1
        oifname "ip6tnl1" ip protocol icmp mark 0x00000012 snat to CE_IPv4:Port_Numbers2
        oifname "ip6tnl1" ip protocol tcp  mark 0x00000012 snat to CE_IPv4:Port_Numbers2
        oifname "ip6tnl1" ip protocol udp  mark 0x00000012 snat to CE_IPv4:Port_Numbers2
        # ..snip..
        oifname "ip6tnl1" ip protocol icmp mark 0x0000001f snat to CE_IPv4:Port_Numbers14
        oifname "ip6tnl1" ip protocol tcp  mark 0x0000001f snat to CE_IPv4:Port_Numbers14
        oifname "ip6tnl1" ip protocol udp  mark 0x0000001f snat to CE_IPv4:Port_Numbers14
    }
}

table ip filter {
    chain input {
        type filter hook input priority 0; policy accept;
    }

    chain forward {
        type filter hook forward priority 0; policy drop;
        oifname "ip6tnl1" tcp flags syn tcp option maxseg size set rt mtu
        ct state established,related accept
        iifname "br0" oifname "ip6tnl1" accept
    }

    chain output {
        type filter hook output priority 0; policy accept;
    }
}
Time to bring up br0, nftables and dnsmasq (if we haven't)!
$ sudo ifup br0
$ sudo rc-service nftables start
$ sudo rc-service s6-dnsmasq start
If everything went well, we now have access IPv4 network via the 4over6 tunnel. IPv4 connections are limited by number of ports being assigned to us (e.g. 210 ports in case of v6plus). This limitation only applies to IPv4 due to how MAP-E works. IPv6 doesn't have this restriction.
Setting up wireless access point
We can turn our APU2 into a wireless access point using hostapd.
$ sudo apk add hostapd
$ sudo mkdir -p /var/svc.d/hostapd
$ cat <<EOF | sudo tee /var/svc.d/hostapd/run
#!/bin/execlineb -P
fdmove -c 2 1
/usr/sbin/hostapd /etc/hostapd/hostapd.conf
EOF

$ cat <<EOF | sudo tee /etc/init.d/s6-hostapd
#!/sbin/openrc-run
description="hostapd supervised under s6"
supervisor=s6
s6_service_path="/var/svc.d/hostapd"

depend() {
        need s6-svscan
}
EOF

$ sudo chmod +x /var/svc.d/hostapd/run
$ sudo chmod +x /etc/init.d/s6-hostapd
$ sudo rc-update add s6-hostapd default
Edit /etc/hostapd/hostapd.conf with the following content:
##### hostapd configuration file ##############################################

interface=wlan0
bridge=br0
driver=nl80211

ctrl_interface=/var/run/hostapd
ctrl_interface_group=0

##### IEEE 802.11 related configuration #######################################

ssid=Borealis
hw_mode=a
channel=36
auth_algs=1
wpa=2
wpa_key_mgmt=WPA-PSK
wpa_pairwise=CCMP
rsn_pairwise=CCMP
wpa_passphrase=SECURE_PASSPHRASE_HERE

country_code=JP
country3=0x49
ieee80211d=1
ieee80211h=1
local_pwr_constraint=3
spectrum_mgmt_required=1

beacon_int=100
dtim_period=2
max_num_sta=255

wmm_enabled=1

# Low priority / AC_BK = background
wmm_ac_bk_cwmin=4
wmm_ac_bk_cwmax=10
wmm_ac_bk_aifs=7
wmm_ac_bk_txop_limit=0
wmm_ac_bk_acm=0

# Normal priority / AC_BE = best effort
wmm_ac_be_aifs=3
wmm_ac_be_cwmin=4
wmm_ac_be_cwmax=10
wmm_ac_be_txop_limit=0
wmm_ac_be_acm=0

# High priority / AC_VI = video
wmm_ac_vi_aifs=2
wmm_ac_vi_cwmin=3
wmm_ac_vi_cwmax=4
wmm_ac_vi_txop_limit=94
wmm_ac_vi_acm=0

# Highest priority / AC_VO = voice
wmm_ac_vo_aifs=2
wmm_ac_vo_cwmin=2
wmm_ac_vo_cwmax=3
wmm_ac_vo_txop_limit=47
wmm_ac_vo_acm=0

##### IEEE 802.11n related configuration ######################################

ieee80211n=1
ht_capab=[LDPC][HT40+][SHORT-GI-20][SHORT-GI-40][TX-STBC][RX-STBC1][MAX-AMSDU-7935][DSS_CK-40]

##### IEEE 802.11ac related configuration #####################################

ieee80211ac=1
vht_capab=[MAX-MPDU-11454][RXLDPC][SHORT-GI-80][TX-STBC-2BY1][RX-ANTENNA-PATTERN][TX-ANTENNA-PATTERN]
vht_oper_chwidth=1
Enable the service and we should be able to connect to the wireless access point!
$ sudo rc-service s6-hostapd start
Finalizing
If everything is working correctly, we can now commit current changes with LBU:
$ sudo lbu status
$ sudo lbu commit
Optionally, we can also configure LBU to make backups of previous commit, so we can revert our machine state if necessary. In /etc/lbu/lbu.conf:
 # what cipher to use with -e option
 DEFAULT_CIPHER=aes-256-cbc

 # Uncomment the row below to encrypt config by default
 # ENCRYPTION=$DEFAULT_CIPHER

 # Uncomment below to avoid <media> option to 'lbu commit'
 # Can also be set to 'floppy'
 LBU_MEDIA=sda1

 # Set the LBU_BACKUPDIR variable in case you prefer to save the apkovls
 # in a normal directory instead of mounting an external media.
 # LBU_BACKUPDIR=/root/config-backups

 # Uncomment below to let lbu make up to 3 backups
-# BACKUP_LIMIT=3
+BACKUP_LIMIT=10
It's also highly recommended to configure firewall with nftables. Arch Linux Wiki has a great example on how to configure simple stateful firewall with nftables. We might also want to use ebtables to prevent IPv4 from getting bridged to eth0 (also add to /usr/libexec/setup-v6plus.sh to make it persist):
$ sudo apk add ebtables
$ sudo ebtables -F
$ sudo ebtables -A FORWARD -p IPV6 -j ACCEPT
$ sudo ebtables -P FORWARD DROP
And that's it!
Changes
- Rev 2 (Nov 14, 2019)
- Supervise services under S6
- Enable 5 GHz and 802.11ac
- Add a disclaimer and a speedtest result
- Rev 1.1 (Nov 12, 2019)
- Correct
hw_modeto use 2.4 GHz (hw_mode=g)
- Correct
- Rev 1 (Nov 9, 2019)
- Publish